
Are you an IT/Sage user and want to install and understand how your bank plugins work in Sage 200?
Well if your Sage is already configured for electronic payments then it should be as simple as 1,2,3.
This week’s Tip of the Week explains how to set up e-banking so that Sage produces a file to upload supplier payments to your bank.

To do this, the plugin for the relevant bank account needs to be installed for every user who will be making Sage payments.
Any user who tries to make a payment but doesn’t have the relevant plugin will receive an error message like the one to the left.
You will require administration permissions to install the plug in.
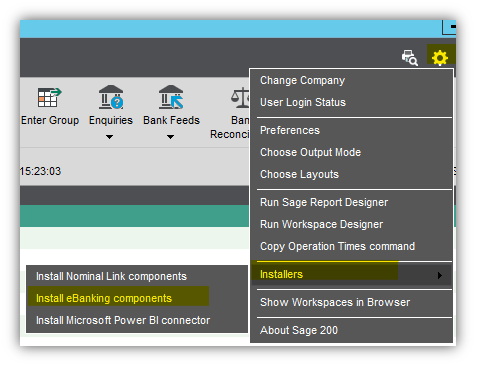
The easiest way to install these is to go to the cog in the top right hand menu of Sage 200 and then, Installers > Install eBanking components.
You will be asked to run the installer. A wizard will then appear for you to click through, during this process you may be asked for admin credentials. If you don’t have these then this is something provided by your IT provider.
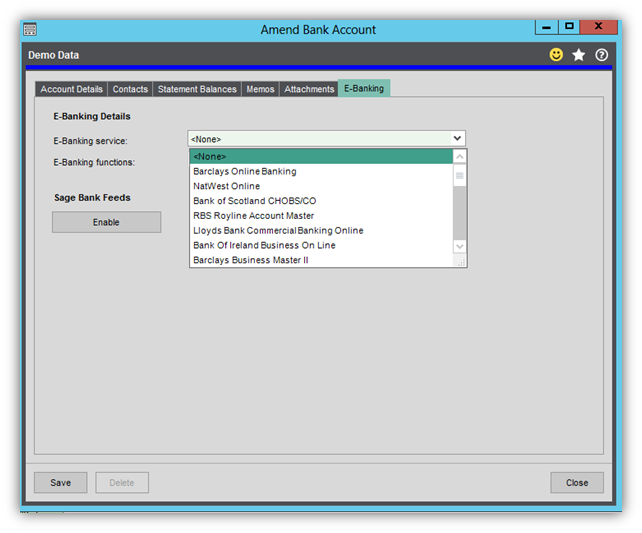
To check that the components have been installed successfully go to your ‘Bank Account List’ and click to amend one of your accounts, navigate to the E-Banking tab and check that a list is visible next to ‘E-Banking service:’
If the components are listed then proceed to ‘Configure your E-banking service’ otherwise continue with the below troubleshooting.
If there is still no dropdown then you can try installing the specific plugin for your bank. The first step is to close your Sage applications. Then navigate here: https://my.sage.co.uk/public/sage-ebanking/compatible-banks.aspx
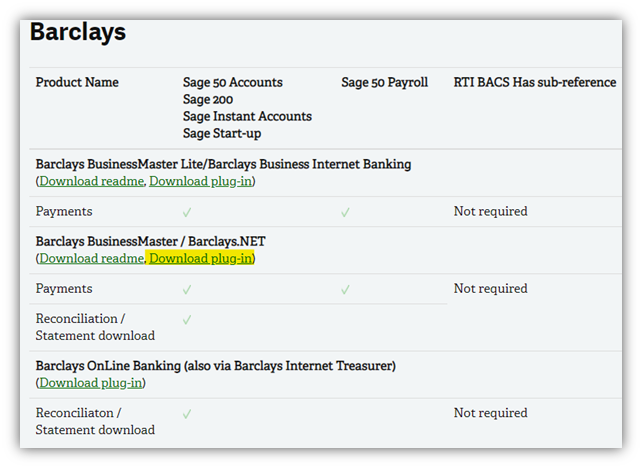
Locate your bank account name and click ‘Download plug-in’ next to the relevant account type.
Again you will be asked to run the installer. A wizard will then appear for you to click through, during this process you may be asked for admin credentials. If you don’t have these then this is something provided by your IT provider.
Re-open Sage 200 and navigate to amend your cash book account. Check if the dropdown against the E-Banking tab now contains the name of your bank account.
If your account is still not listed in the dropdown then this is usually because you have insufficient privileges to install the plugin, in which case please refer to your IT provider to check.
Configure your e-Banking Service

Once the components are installed successfully you need to configure your cash book account.
Navigate to the Cash Book > Bank Account List. Highlight the bank account from which these payments are to be made and click ‘Amend Account’.
Go to the E-Banking tab, and next to ‘E-Banking Service’ select your account name.
Next to ‘E-Banking Functions’ select ‘Payments Only’.
Then click ‘File Locations’.
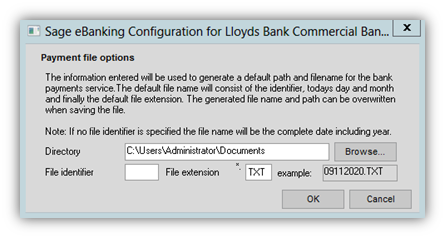
When you run generate payments to E-banking accounts Sage outputs a file which you then use to upload your payments to your bank account.
Within ‘File Locations’ you can set the location that Sage will automatically save this, click ‘Browse’ next to the ‘Directory’ and navigate to a suitable file location.
Your bank will require the upload file to either be a TXT or CSV file. You can find this out from your bank account or from another user who already has this set up. You must identify this against the ‘File extension’, enter either TXT or CSV in this box.
Click ‘OK’ and then ‘Save’ your bank account. You are now ready to generate Sage payments.
If you would like to stay in the loop about our latest tips then make sure you are following us on Twitter, LinkedIn and Facebook!
As we are constantly looking at ways in which we can improve our service, you are more than welcome to leave your feedback on our form. If you have any suggestions for what you would like to see featured as a tip of the week please email [email protected].
If you would like more support concerning your Sage system, take a look at our Sage support service. Contact us via the enquiry forms or call 01332 959 008 if you would like more information.
NB: Be advised that the information/accuracy in this article may differ depending on which version of Sage 200 you use, as a result, some options and processes might look different. For all support queries please email [email protected].
Interested to know more about our Sage solutions?
Call 01332 959008 or enquire online today
"*" indicates required fields