
Creating analysis codes is one of Sage 200’s handy extras.
These analysis codes give you the ability to analyse and drill down into accounts and transactions.
After creating your analysis codes, you can group or split your information further by adding in custom fields to the ledgers that you can use later to report on.
Also, as the UK has left the EU Single Market & Customs Union, there is now some extra pieces of information that may you need to include in your reports or layouts.
One of the pieces of information now required is an EORI number, potentially, for both Customers and Suppliers. Analysis codes are a simple way of including this information in your system.
All analysis codes must be set up in Accounting System Manager first and then can be added on to the respective ledgers.
Go to Accounting System Manager > Settings > Maintain Analysis Codes
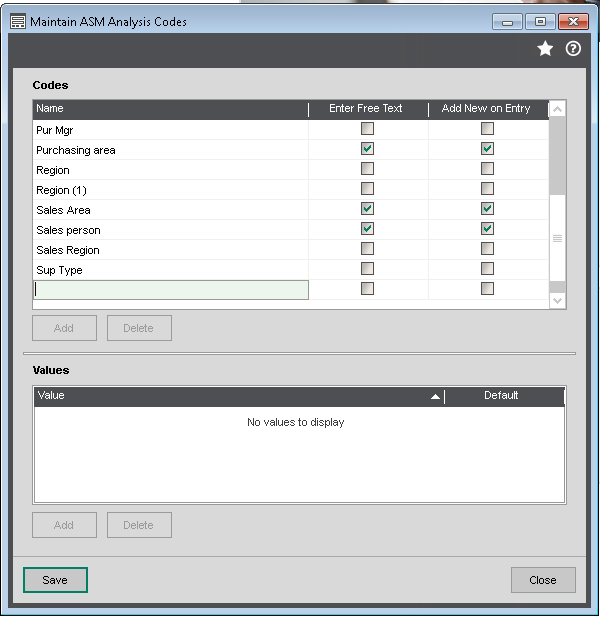
- Enter the name of the new analysis code, and any values you wish to be associated with it.
- If you wish to make the analysis code mandatory elsewhere in the system, there must be a default value set against it here in ASM.
- Tick Enter Free Text if you wish to be able to type your own values when entering on to the account/order. These will not be stored as values for future users.
- Tick Add New on Entry if you wish to be able to add values on to the ledger which will then be available for future users to select.
Set up in the ledger
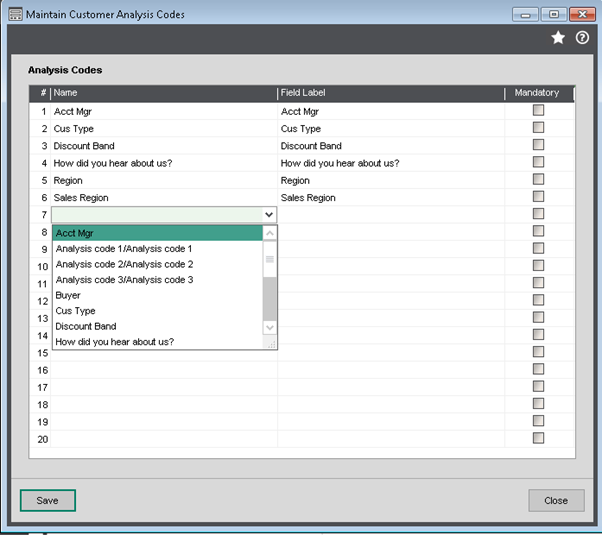
Sales Ledger > Utilities > Ledger Set Up > Maintain Analysis Codes
Purchase Ledger > Utilities > Ledger Set Up > Maintain Analysis Codes
Sales Order Processing > SOP Maintenance > Maintain Analysis Codes
Purchase Order Processing > POP Maintenance > Maintain Analysis Codes
- Select a blank row in the Name column and select a code from the drop-down list.
- If required, enter a different Field Label.
- Select Mandatory if all accounts/orders must use this code.
POP and SOP have the following extra settings:
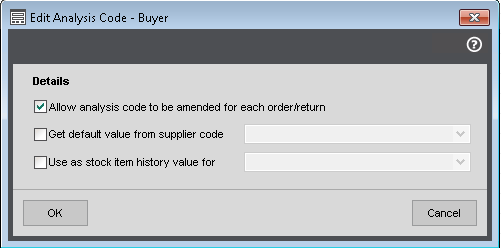
Allow analysis code to be amended for each order/return:
- Select this to allow this analysis codes to be changed when entering an order.
- To do this, you must have selected the allow amendment of analysis codes setting in the SOP/POP settings Order Entry tab.
- You can choose whether analysis codes can be amended on the order header, the order line, or both.
Get default value from supplier code:
- Select this to use the Value specified as the default in the relevant account. Use the drop-down list to select the analysis code whose default value you want to use.
Use stock item history value for:
- Select this to include the analysis code in the stock item history.
If you would like to stay in the loop about our latest tip then make sure you are following us on Twitter, LinkedIn and Facebook!
As we are constantly looking at ways in which we can improve our service, you are more than welcome to leave your feedback on our form. If you have any suggestions for what you would like to see featured as a tip of the week please email [email protected].
If you would like more support concerning your Sage system, take a look at our Sage support service. Contact us via the enquiry forms or call 01332 959 008 if you would like more information.
NB: Be advised that the information/accuracy in this article may differ depending on which version of Sage 200 you use, as a result, some options and processes might look different. For all support queries please email [email protected].
Interested to know more about our Sage solutions?
Call 01332 959008 or enquire online today
"*" indicates required fields